One of my lovely coworkers is moving into his first owned home and is excited to start painting some walls! Him and his wife have never painted before though. Even though my dad is a contractor, I wasn’t really that involved in too many DIYs growing up so I know the growing pains with trying to learn something that feels like everyone else knows. Therefore, I put together the following list of my Painting Essentials that should be on every beginner’s shopping list! Hint: I even made one for you at the bottom!
Prepping your area:
Filling Holes

Before you start putting paint to the walls, you will want to have the best canvas possible! Caulk gaps around baseboards (to the wall – NOT the floor side) or other trim. Make sure you use paintable caulk. Remove everything off the walls and fill any holes or damaged areas. There’s a million and one products out there, but a simple spackling tub and “spatula” (I call it a spatula but that is not what it is actually called lol) will be very versatile for your needs. I like to use this DAP DryDex Spackling because you know it is dry once it all dries white. Super beginner friendly! Other people have used this 3M Patch Plus, but I have not personally tried it myself. Remember, it’s better to have it on a little thin than too heavy! You can always do more coats but sanding sucks.
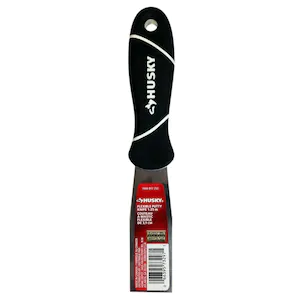
I have tried different items to apply spackling, but my favourite so far is this Husky 1 1/4 inch Flex Putty Knife (what I call a spatula). It fits into the smaller containers nicely, flexes well on the wall, and is easy to clean up.
After the spackling has dried, you will want to sand it flush. I suggest using a 220 grit sanding block.
Tape:
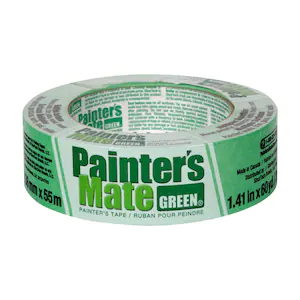
Maybe you’re just touching up some trim, or want the trim and wall colour differently. Either way, it’s common to maybe have some areas you don’t necessarily want to get paint onto. Until you have mastered cutting in, I would suggest using tape. Now I do like Frog Tape and find it performs better – but if you are doing a large amount of taping, it adds up in cost quickly. Save yourself some money and get just the plain green painter’s tape in the standard 1.41inch size. If you are doing any extra fancy designs where you need to tape over fresh paint, I would highly suggest using the delicate surface painter’s tape! If you have very textured ceilings, keep reading as I’ll go over how to handle extra textured areas in the end.
Covering Floors:
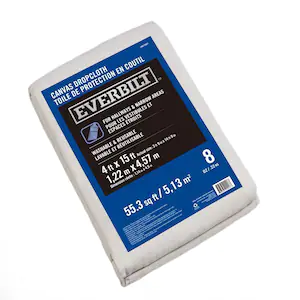
This is one of those “if you want to risk it, go for it” moments. I really only use a drop cloth when I’m painting ceilings but if you are nervous about getting paint on your floors – or painting in a room with carpet, then I get it. Cleaning up paint sucks. So do plastic drop clothes. They are handy in that they are cheap and easy to replace… but one kick on of the AC or furnace and those things are floating up and risk falling into your paint tray.
A good canvas drop cloth can be used over and over again on so many projects. With it’s heavier weight too, you don’t need to worry about it being picked up by movement of air. I like this 3.5ft X 14.5ft (ish) drop cloth as you can move it around the room without it being too big and bulky. But honestly get whatever size you like.
Applicators:
If this is your first project, or you might not be doing many, I suggest going “old school” and using a good ol’ roller and paint brush. Paint sprayers are handy but require a lot of time to prepare for, additional supplies, and are a high upfront cost. Plus, even with a sprayer you likely will still want a roller and paint brush on hand!
Paint brush
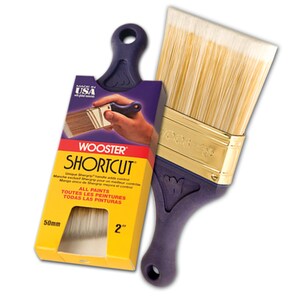
My favourite paint brush for cutting in is a cult classic. The Wooster 2in. Shortcut brush is a favourite in the DIY community for so many reasons. It is incredibly user friendly with a flexible handle and washes up well. You can get one with a little hanger on it to hook off of paint buckets, but I don’t find that necessary. You can use any angled brush though! I would suggest looking at a 2 – 2.5in brush that is a combo of polyester and nylon.
Rollers:
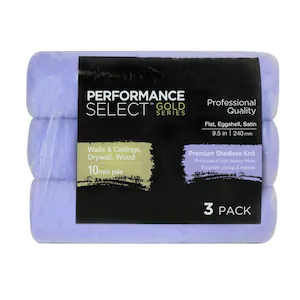
Paint rollers is one of those things that I always think “how hard can it be” and then I saw the options and immediately went “well crap.” There are so many types! Foam, woven, nap.. where to start? Well don’t get overwhelmed! The higher the mm on the nap = the more textured your wall should be. For an average drywalled wall, I use 10mm. Also read on the tag for what kind of sheen you are using! Often walls are flat, eggshell, or satin. I have used these for years. Are there better rollers out there? Probably. Do I feel like spending a small fortune trying them all out? Maybe one day. But for today these come in a 3 pack and are decent. Don’t forget to get a cage to fit it!
Hot tip: even when rollers say “lint free” or “shedless,” I’m convinced it’s all a gimmick. Wrap your paint roller in painter’s tape before using it! Also washing it quickly helps too, and for it to not suck up as much paint for the first roll.
Paint Vessels
Before you leave the store, do yourself a favour and test to see if the new roller and cage you got will fit in the tray you want. Or that the liners also fit the tray. Or else you will end up like me with a dozen trays and liners that somehow never fit each other. You can get trays in a handy pack with some paint rollers and whatnot. Those are great as a quick grab! But if you are wanting to choose your own tray, I suggest getting one that’s a heavier plastic. Also if you can’t find a liner that you like – use saran wrap or tinfoil! Works great. Really though, at the end of the day, you don’t even really need liners if you wash your tray out.
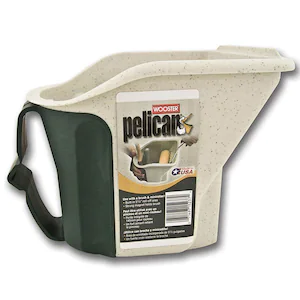
If you are doing a lot of cutting in though and don’t want to carry your pail up and down a ladder, a paint bucket is a great handy thing to invest in. I resisted for years “Who needs a $10-$15 bucket!” but oh man it makes the job so much easier. I have used both the Richard paint pail and the Wooster Pelican Pail. Honestly, they both do the job so it’s whichever you find the most comfortable. I’m inclined to say that I like the Wooster Pelican Pail more for jobs where I’m also going to be using smaller rollers (painting furniture for example). But they’re both great options! Just make sure you get the right liners to go with it.
Accessing the paint:
You will need to be able to open those damn pails at some point. Spend the literal $1 and get yourself a paint opener. Or two incase you lose the first one.
Once it’s open, you’ll need to mix the paint. Grab a handful of paint stir sticks at the paint counter. They are free. You will thank me for having more than one on hand if your project takes a few days.
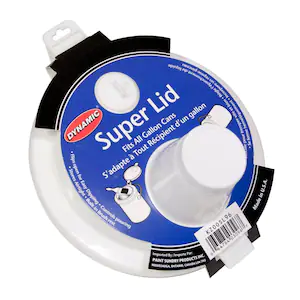
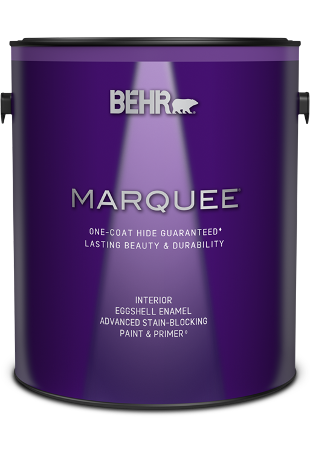
This is a “nice to have” but if you’re like me and make a mess every time you pour paint, it’s so handy. I have one of these paint lids on every one of my paint buckets. It makes pouring the paint significantly less messy. Just make sure you take a picture of the lid for paint colours references, or ask them to put the stick on the body of the can vs the lid. Note: if you get the Behr Marquee line, ask for the complimentary spout at the mixing counter!
Priming:
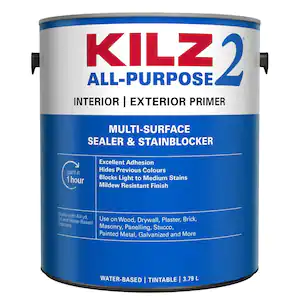
You are so close to getting to paint now! You have your walls patched, floors protected, ceiling taped off. But now this is a step that falls into a little big of a gray area. I really only prime if I am going dark to light, if I’ve done a lot of patching, or if I know I am not using a good quality prime and painter in one. Here’s the thing: primer is cheaper to buy than paint. So if you are going to go from a darker colour to white, save your wallet and get a gallon of primer first. Will the extra work kind of suck? Yes. Will it suck less than doing extra coats of your paint? Also yes. This is also why I will use primer if (if I have it on hand already) and just want to grab a cheap gal of paint only. I don’t really recommend this option because I think a good primer + paint is worth it, but hey sometimes you need to get the job done. I also will prime if I have done a lot of spackling so that it doesn’t cause flashing.
Note: there are specialty primers if you are needing to really cover stains or remove odors. Extra note: if you are painting over bare drywall, use a drywall primer or ensure your primer is also a sealer. Drywall will suck up your paint!
Painting:
Finally you are putting paint up on those walls! Yay!! Now you’re standing in the aisle probably thinking “why are there so many options of just plain paint??” Yeah – I got you.
There are four things to look for on your bucket of paint:
- Is it indoor or outdoor. Pick which is right for your project.
- Is it just paint or is it a paint/primer in one. I prefer a paint/primer in one for coverage.
- What is the sheen. This depends on your preference and where you’re painting.
- What is the base colour (white, medium, dark). Different paint colours require different base tints. Ask at the desk if you need help!
Sheen
Higher the sheen, the easier to clean. Typically semi-gloss or or high-gloss is used on trim because of that. Often you will find eggshell and satin as the recommended sheens for walls, with flat for ceilings. With more brands coming out with technology for their flat and matte paints though, as long as you get a good paint you can do whatever your little heart desires! Remember too: sheens will change how your paint colours reflects light which will change how it looks. Higher gloss will also show more imperfections in your walls, so keep that in mind when you’re sanding. So if you are getting samples, you will want it to be in the sheen you are going to use. There are a TON of resources online about paint sheen so I won’t get into that too far.
Brands:
There are so many brands of paint, and honestly quality does matter. I have used almost every version of Glidden. (Which is how I know that I don’t really love just paint vs paint/primer combos even though it saves $ initially). The higher end of Glidden paints which is now the lowest I will go for a project. I also am a fan of the Behr paints, and Benjamin Moore. We have used Sherwin Williams on a few projects, and while I love their colors, the coverage just wasn’t there for me. Economically wise though, Glidden, followed by Behr, will be your best bet. Their samples are also less expensive than Benjamin Moore or Sherwin Williams, and are in the higher quality paints as well.
Bonus: Painting Ceilings
If you are starting out painting and looking to paint your ceiling white, I highly suggest getting ceiling paint specifically for the project! Look for paints that goes on with a pink tint and will dry white. This is super handy for second coats where you’re not sure if you’ve painted somewhere or not!
I hope this helps with your first time painting and what to look for! I will also be putting together a compilation of my favourite painting tips that I wish I had known before I started.
Click here to download my FREE PAINT SUPPLIES SHOPPING LIST
Click here for a list of paint colours we have used in our home!


kaydin
So helpful!
Jung Hinckle
I was very happy to find this web site. I wanted to thank you for ones time for this particularly wonderful read!! I definitely really liked every part of it and i also have you book marked to see new things on your site.
Buy Private Proxies
Your style is unique in comparison to other people I’ve read stuff from. Thank you for posting when you have the opportunity, Guess I’ll just book mark this page.